All you need to know about Carpenter's Square - 15

Diagram 15.1: White to play
Black's condition appears to be slightly better than in Shape 14 because of the extra  bend. What can white do now?

Diagram 15.2: White fails
While  works well in Diagram 14.4, it doesn't work here. The extra bend is perfect now to enlarge the eyespace. After
  , note that white can only form a seki by playing 'a' (this is not Bulky Five).

Diagram 15.3: Solution 1
works well in Diagram 14.3 and it continues to work here. Both and  are forcing moves. White can form an eye in the corner to win the capturing race by one liberty. Black 'a' instead of
  doesn't help either as the common liberty belong to the side with an eye. So black corner is killed.

Diagram 15.4: white is tricked
 doesn't feel like a good move but white needs to be careful. is tricked. After
  , although black's shape is very ugly, white cannot kill it.
  is a famous tesuji to create a ko fight.
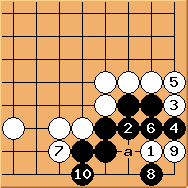
Diagram 15.5: Variation
 doesn't work either but black need to know to play instead of 'a'.

Diagram 15.6: Solution 2
Luckily for white, the right solution is still at - easy to remember.  is the best move, leaving 'a' and 'b' as miai points, resulting in Eye versus No Eye capturing race.
To summarise: surprisingly the extra bend doesn't help black. White can following either Diagram 15.3 or Diagram 15.6 to kill the corner. Just remember that 1-2 is the key point.
