All you need to know about Carpenter's Square - 33
Submitted by macelee on 2013-02-23 06:55; Last upda
ted on: 2018-11-17 17:36
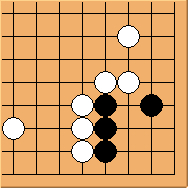
Diagram 33.1: White to play
This is yet another 'incomplete' Carpenter's Square.

Diagram 33.2: Benchmark
We again use the standard Carpenter's Square as a benchmark. Can white can anything better than a direct ko?

Diagram 33.3: Variation
 can also play this a very flexible shape to form a ko.
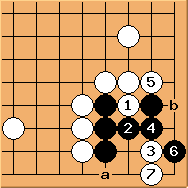
Diagram 33.4: Solution
 then
then  is the correct combination. After
  , 'a' and 'b' are miai points so the corner is dead.

Diagram 33.5: Variation
doesn't work either. After the corner is dead too due to short of eyespace.
Conclusion: this 'incomplete' Carpenter's Square can be killed. Diagram 33.4 is the only correct way.
