Submitted by macelee on 2013-02-08 12:51; Last upda
ted on: 2018-11-17 17:31
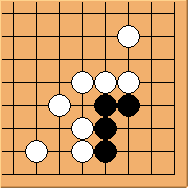
Diagram 24.1: White to play
The extra external liberty makes a lot of difference. What's the best strategy for white?
Submitted by macelee on 2013-02-07 15:06; Last upda
ted on: 2018-11-17 17:28
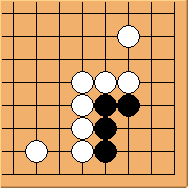
Diagram 23.1: White to play
Let's study this 'incomplete' Carpenter's Square.
Submitted by macelee on 2013-02-07 06:43; Last upda
ted on: 2018-11-17 17:25
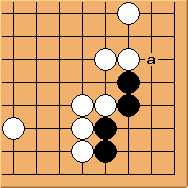
Diagram 22.1: White to play
We already learned that attacking at 'a' from outside is not working. What else?
Submitted by macelee on 2013-02-04 19:29; Last upda
ted on: 2018-11-17 17:23
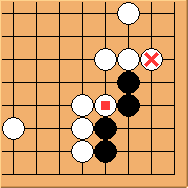
Diagram 21.1: Black to play
Submitted by macelee on 2013-02-03 16:50; Last upda
ted on: 2018-11-17 17:21

Diagram 20.1: White to play
Does  help in any way?
Submitted by macelee on 2013-02-03 11:17; Last upda
ted on: 2018-11-17 17:20
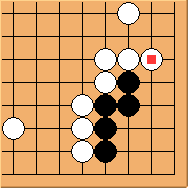
Diagram 19.1: White to play
Submitted by macelee on 2013-02-02 10:32; Last upda
ted on: 2018-11-17 17:17

Diagram 18.1: White to play
This shape is commonly seen in real games. Please consider what white can do?
Submitted by macelee on 2013-01-31 21:19; Last upda
ted on: 2018-11-17 17:13
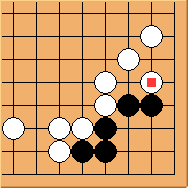
Diagram 17.1: White to play
Submitted by macelee on 2013-01-30 20:47; Last upda
ted on: 2018-11-17 17:12
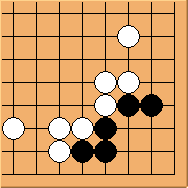
Diagram 16.1: White to play
Black is blocked from the bottom side instead. This shape is commonly seen in real games. What can white do?
Submitted by macelee on 2013-01-29 18:13; Last upda
ted on: 2018-11-17 17:09

Diagram 15.1: White to play
Pages
